Sowing Time
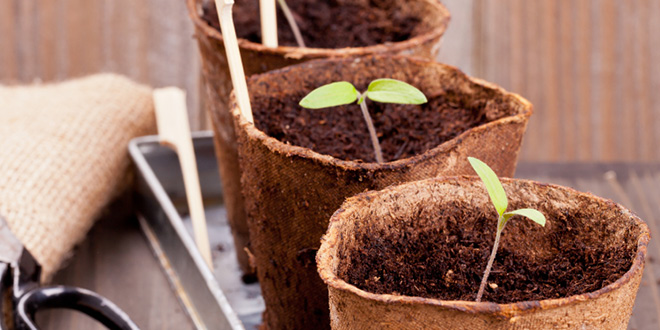
Now that January is here it’s a perfect time to start sowing seeds in trays and pots. But how do you make sure that yours germinate and produce seedlings and then plants which thrive and grow well?
A shopping list for first time sowers should be:
- Good quality seed and cuttings compost.
- Some seed half-trays, which are about 5” x 8”.
- A heated propagator, a clear propagator lid to go over the trays or a small unheated propagator.
- A dibber to make it easy to transplant the seedlings into a new home.
- Some small pots into which you can transplant the seedlings.
If you buy seed and cuttings compost it’s rarely necessary to sieve it as it has a very fine and even texture. However, if you’re using multi-purpose compost, you’ll need to either break up any lumps carefully with your hands or sieve it.
Depending on the types of seeds you have chosen, you will need to sow them at different depths. Some seeds are tiny and are best scattered over the surface. Other seeds are best sown in drills. Once they are in place, in most cases you need to cover them with compost to the required depth. However others germinate best if allowed access to daylight and should be sown on the surface. With these it’s advisable to cover the surface of the tray with cling film to stop it drying out too rapidly. I like to put the seeds in place and then moisten the compost. Place the seed trays in a sink or tray containing about 1cm of water and allow the
compost to soak up the water. Once the compost is just moist you should stand the trays in a position where any excess water can drain off. Then, if necessary, put the trays in a heated propagator.
When it comes to watering the seeds, use mains water as water butts may harbour some of the disease-causing organisms which cause damping off, the fatal condition where the seedlings appear to suddenly flop and keel over.
Always watch the seed trays carefully and check them regularly to ensure that the compost is adequately moist. Once the majority of the seedlings have appeared, it’s usually not long before you need to prick them out. Generally this is carried out when the first true leaves appear. When the seedling first comes above ground you will see the ‘seed leaves’ which are relatively sturdy looking and rounded in shape. Then above this come the first true leaves which are typical of that particular plant.
When pricking out, handle the seedlings very carefully, never by their stems or true leaves, but always by the seed leaves. Before you start to ease them out, make sure that the compost is adequately moist, so that the roots move readily without damage and that you have already prepared pots for transfer. To avoid rotting, always transplant seedlings so that they are at the same depth as they were in the seed tray.
If you find that your seedlings have become rather leggy and drawn, this is usually because they’re not receiving enough natural light; move the trays onto a south or west facing windowsill.
Visit Pippa’s website www.pippagreenwood.com for a great range of gardening items including ‘Grow Your Own with Pippa Greenwood’. Choose the veg you’d like to grow and they’re sent to you ready to plant, accompanied by weekly advice emails from Pippa.
Related Stories